![[Checkout MX South]](../../../images/Banners/MXSouth/MXSouthAnim468x60.gif)
MX South is currently offering a 20% discount to the person that provides the
best submission, each month, to All-OffRoad. Submit your story NOW!
Roll Your Own Dual Sport (part 1)
Note: Darcy Brockbank resides in Quebec, Canada. These modifications (such as the rear turn signals) may not be considered legal were you live – or for that matter where he lives .
 What's a
poor boy to do when he lives downtown, has no car, and wants to ride in the dirt? Well,
the answer is pretty clear: pick yourself a decent dual-sport, and drive out to the
trails.
What's a
poor boy to do when he lives downtown, has no car, and wants to ride in the dirt? Well,
the answer is pretty clear: pick yourself a decent dual-sport, and drive out to the
trails.
However, for some of us, the average dual-sport bike offers a bit too much compromise. Often the bikes are better suited for their street purpose than the dirt, and that wasn't what I wanted. I wanted a bike that was built to go in the dirt first, and was legal for the street second. So, my path was evident: I had to start with a dirt weapon, and modify away until the government signed off on its eligibility for the street.
Selecting your Mount
The first thing I had to do was select an appropriate mount to begin my project. The first machine I ever popped the clutch on was an orange 1977 190-pound KD100 trail tank, er, bike. It was first purchased by my older brother, beaten severely, handed down to me, beaten severely, then handed down to my younger brother, again beaten severely, and finally sold. I still love that bike, and its ability to take a licking and continue to operate still amazes me. Twenty years later Kawasaki is still making this little trail bike in a dual-sport model, the KE100.
So, with Kawasaki tattooed on my heart, it was pretty clear which manufacturer I was going to go with, and my choice of mounts came down to three: The KLX650, the KLX250, or the KDX200. The KDX200 is a very nice package... plenty of fun-yielding power, nice handling, and a blast on the trail. I was worried about the two-stroke powerplant, as the vision of carrying around two-stroke oil in a backpack on the highway and mixing on the fly didn't seem to be the right thing. Furthermore, I've spent some time with Matt on the Nevada Motorcycle Adventures ride. Being out there on the trail with a quiet four-stroke DR350, and not disturbing the peace of the wilderness added to the overall enjoyment of the trip. I also had some questions in my mind about how amenable the local government would be to two-strokes on the road in the near future. So, with all this in mind, I discarded the two-stroke-powered KDX, and sat down to contemplate the KLX machines.
My dilemma was pretty obvious at this point. The KLX650 was more machine than I needed, heavy and powerful. The DR350 was a great bike for Nevada, but overall, I found that a bike tipping the scales at 300 lbs. wet didn't offer the rounded riding experience that I needed. The KLX650 tips the scales at 285 lbs. dry, and while it's much more powerful than the 350, I just didn't see myself zipping between trees on that thing. Maybe shooting on a straight line through the desert, but five hours negotiating tight terrain would be exhausting on the 650.
On the other hand, the KLX250 didn't seem to be enough. While there was general praise for the bike in handling, it's a pretty docile beast, and I was a bit worried about not having enough power on the highway or on demand on the trail. I'm over six-one and 210 lbs., so more power than what the 250 could deliver would be appreciated.
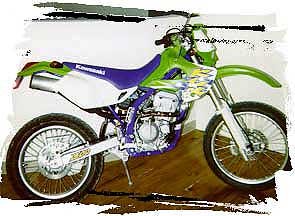 Luckily for me, the week after I had decided to go
four stroke, Kawasaki introduced the KLX300. Essentially a bored out 250, with a
KX-inspired frame, the 300 has a bit more kick than the 250, while being the best handling
bike I've ever had the pleasure to ride. The choice was made, and the 300 was chosen as my
starting point. I also knew that if I had the inclination, I could always have Stroker
Racing do their special magic with my 300, and I'd have a true giant killer while still
having all the nice features of the KLX300 package.
Luckily for me, the week after I had decided to go
four stroke, Kawasaki introduced the KLX300. Essentially a bored out 250, with a
KX-inspired frame, the 300 has a bit more kick than the 250, while being the best handling
bike I've ever had the pleasure to ride. The choice was made, and the 300 was chosen as my
starting point. I also knew that if I had the inclination, I could always have Stroker
Racing do their special magic with my 300, and I'd have a true giant killer while still
having all the nice features of the KLX300 package.
Negotiating the Legalities
At this point, it's pretty important to check with your local government about eligibility rules for modifying off-road vehicles for use on the street. I failed to do this, assuming that the process would be simple. While often the process is, depending on where you are, you can run into several stumbling blocks. The first is that the vehicle you're trying to get plated may simply be ruled out by local legislation. Check with your state or province's transportation bureau or ministry and ask if your vehicle is explicitly prohibited from conversion to street legality. The second stumbling block which you may hit is that the local government may have no checklist in place for dealing with conversions. If there is no checklist for you to follow in preparing your vehicle, the final decision on granting you a plate is left as a judgement call for one of the government bureaucrats. If you shuddered while contemplating that eventuality, you shuddered correctly. Bureaucrats do not often want to take responsibility one way or another, so you can get caught up in a paper chase (as I did).
If the local government does have a checklist in their legislation, ask to have a copy sent to you. Remember, your taxes pay for the government, and it's your right to use their services. Having the checklist in hand will help you when you go to the licensing office to pick up a plate.
I would recommend that after you choose your vehicle, and discover whether or not it is eligible for conversion, you should establish a relationship with someone in the appropriate bureau that will oversee your case, if you don't have a simple set of rules to follow. After having obtained a contact with the government who will be responsible for your case, you should then proceed with the modifications.
Making the Modifications
You can pretty much count on having to add the following equipment to your bike to become road-worthy:
- turn signals
- brake lights, front and rear brake light activation cables
- mirrors
- dual-sport tires
- horn
- high-beam headlamp
- battery (to power the lights if the engine dies)
Furthermore, in some places you might have to be concerned about noise emissions, and/or having a speedometer. Beyond this, you should consult the checklist for modifying an off-road vehicle for any special modifications required by your local government.
Other modifications you might have to make include:
- fender extension
- reflectors
- speedometer
- chain guard
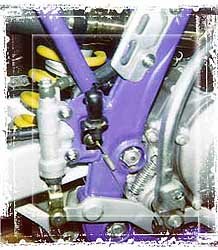
The mods made to my KLX include sensors to trigger the brake light both for rear and front breaks. The photo is taken sideways, so crank your head around!
|
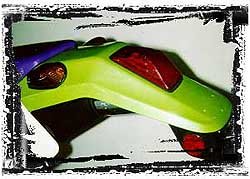
These neat teardrop-shaped flashers hug the
fender, both keeping the look of the machine honest-to-dirt, and making it hard for
branches or spills to de-flasher you. Note also the fender extension, and reflectors.
|
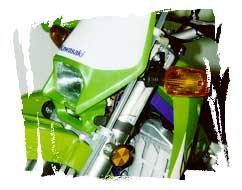 Flashers on rubber mounts sit astride a small dual-beam headlamp. The bike still looks nearly stock. What you can't see is a button for the horn, switch for the flashers, and the high beam headlamp. |
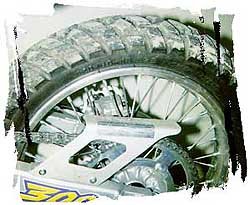 Unfortunately for us, we
can't run full knobbies. This back tire is a Metzeler Enduro Sahara, and doesn't seem too
bad so far. Dunlop makes some decent dual sport tires with a more aggressive footing.
Monette Sport made the chain-guard for this bike. You'll likely need one too in order to
pass your safety. Unfortunately for us, we
can't run full knobbies. This back tire is a Metzeler Enduro Sahara, and doesn't seem too
bad so far. Dunlop makes some decent dual sport tires with a more aggressive footing.
Monette Sport made the chain-guard for this bike. You'll likely need one too in order to
pass your safety. |
There are several manufacturers that make dual-sport kits, and you can often find these kits on the internet, or in your favorite biking magazine. The cost is usually between two and five hundred dollars, and you can do the mods yourself. Of these modifications, the most important is likely the choice of tire. You want to have something that wears pretty well in the city, grips in the rain on asphalt, while not sacrificing too much in the dirt. Finding such a tire can be hard, and you will have to make your own decisions based on how aggressive you want to be on the trail. It's important not to sacrifice safety on the road however. You can't have any fun riding on the trail when you're in a hospital bed because your tires couldn't hold the road in the rain.
If you're not of a mind to do these mods yourself, the place where you purchased your bike should be able to do them for you.
Passing the Tests
After you've made all the required mods, you will have to bring your motorcycle in for a series of tests. Depending on your state or provincial government, this can be simple or complicated. You should at least count on a standard mechanical inspection, also known as a safety test.
You will have to locate a shop which has been certified by your state or provincial government to handle these inspections. You can find them by either asking your local bike shop, or calling the transportation bureau and getting a list of certified inspectors. Once you select one, make an appointment, and be prepared to cart the bike over. If you fail inspection, you have a chance to make any necessary modifications needed to pass. The mechanic will point these out to you. After you pass, you'll be given a document certifying compliance with the highway standards, and likely some stickers to attach to the frame of the bike, attesting the same.
After this inspection, or possibly in place of this inspection, you might have to conduct an "artisan" inspection. This test is designed for vehicles such as kit cars, or any vehicles built by scratch. The drill is the same, but you should make sure you know which inspection you require before making any appointments. Most places will only require one of the two.
After the mechanical/artisan inspection, you might require a police inspection. When your dirt machine is certified for use on the street, you could be given a new serial number. If this is the case, the police might have to verify that your current serial number is valid, and does not represent a stolen bike. At this point, you will again be given documents and/or stickers for your frame.
Getting the Plate
With all the inspections passed, you should contact an insurance company and insure your bike for use on the street. Don't bother getting a plate if you can't get insurance.
With your inspection documents in hand, a copy of the checklist, a valid drivers license, enough cash to pay for the plate (cash or cheque, call the office first to determine how much the plate will cost), and having your insurance already in place, go to your local licensing office to pick up your plate. If you've done everything in this order, you should be processed simply and quickly. You're now set to ride your dirt machine on the street, and attract curious crowds of city dwellers that have never seen an enduro bike on the road. Of course, you don't care, because you just want to hop on and get to the trail, where the real fun is!
Trials and Tribulations
What you don't want to go through is what I went through. I made lots of mistakes along the way, owing to a less-than-friendly and over-bureaucratic Quebec government. In this province, the decision about road-worthiness of your vehicle is made by a bureaucrat who looks at the inspection papers and makes a judgement call. There is no set of rules, you cannot talk to the bureaucrat in question, and he or she never actually looks at your motorcycle.
They sent me to four inspections in total, and indicated I would be plated on two separate occasions. After four months of tweaks and waiting, they finally closed my file and told me the motorcycle would never see the highway in Quebec. I asked them what their reason was, and the answer filtered down the bureaucratic pipeline as a firm "because I said so." It seems that it's not all off-road motorcycles, nor all KLX300 motorcycles they're denying. It's just my particular bike. Apparently, I could go buy a new KLX300 and perform the entire process again and get a plate. Of course, you and I both know that this makes no sense, but that's government for you.
If this happens to you, you still have options. In my case, I've added a battery, took apart a PC power supply for cabling and a switch. I got a wiring diagram from my dealer, and wired the battery and switch into the circuit. It's primitive, and the bike won't start without the switch on, but at least I have power to the headlight and taillight when the engine is off.
After I made this modification, I took the bike to Ontario, and passed the test and had it plated there. With my Ontario plate, I have two options: switch for a Quebec plate, or move back to Ontario. I plan the latter.
Next year, I plan on upping the ante, and plating a new YZ400F for the road. Wish me luck.
(Be sure to check out Part 2 he didn't stop here...)
Note: Baja Designs made some of the equipment I used in legalizing my KLX. I had a few issues with their service, and certainly I do not feel that they charge a reasonable price for their product. Component by component, you could save at least 75% (yes, 75%) on their list price of $300 to $400 USD for a dual sport kit from them by making parts yourself, or getting them at a junkyard. The typical thing with them is if you add a part to a kit, it would cost you say, $15.00. If you subtracted that same part, they would subtract $2.00 from the kit's price. I've never seen anyone do this kind of pricing magic. 50% of the time they're horrible to deal with, and 50% of the time they're excellent. So, your mileage may vary.
Darcy Brockbank is a multi-semi-talented jack-of-all-trades. He spends his time writing software, playing with photography, making noise on one of his guitars, and (hopefully) riding his green street enduro. You can contact him at darcy@hasc.com or via the web at his home page.
![[Home]](../../../images/Navigation/DirtHome.jpg)
![[On to Part 2]](../../../images/Navigation/DirtRight.jpg)