![[Checkout MX South]](../../../images/Banners/MXSouth/MXSouthAnim468x60.gif)
MX South is currently offering a 20% discount to the person that provides the
best submission, each month, to All-OffRoad. Submit your story NOW!
Roll your own Dual-Sport (part 2)
And now for the dirt!
Let's say you're 12 years old. You've got a well-used and well-worn-in dirt bike. Maybe your dad, or your older brother teaches you how to ride and how to maintain your bike. You learn to change the oil, adjust the chain, and make sure you've got the right pressure in your tires. Every now and then, you ride the bike to the end of your driveway and back to the garage. You stop, and look over your shoulder to the forbidden area, where you've been warned that the police will take away your bike if they find it there: the street. Every now and then, your little testing laps take you out onto that taboo zone... maybe you get brave and ride to the end of the street and back, but you know you can never truly go there.
Part of this project of mine was to fulfill this boyhood desire of getting a dirt bike onto the street. The previous section talks about how I did that... eventually, I did get my plate. This section deals with the dark side... taking your homemade dual sport and turning it into an off-road racing machine. This is truly the best of all worlds, and the boy in me delights in ripping around the dirt and the road on my KLX331.
Figuring Out What's Needed
This winter was a very interesting winter. After doing the street mods to the KLX300 last summer, I took it out for the Vetra Dual Sport loop in Vermont. This 227-mile loop consists of some awesome riding. It mixes relaxing rides on fire roads through the scenic mountains of Vermont with some insanely hard uphill technical sections.
Imagine yourself riding up a waterpark's water slide tube filled with football sized rocks, and you'll get the picture.
After the extensive highway riding on the KLX, and getting more familiar with the bike during the off-road sections of the loop, I found that there were several things I needed to do to take my experience to the next level. I already had a nice package that would get me to the trail legally, but I now needed to maximize my ability to handle what the great outdoors would throw my way.
The stock suspension worked fine on the hellish technical sections, but the bike didn't have much top end for the highway, and the responsiveness of the motor wasn't all it could be when I had to clear obstacles. Often, I would give it too much gas trying to deal with the laggy responsiveness, only to rocket out of control when the revs finally came on in a surge. The dual sport tires given me by my dealer also did not cut it. I had the original rubber put back on (Dunlop K490/K695) but that's not quite street legal... so some work had to be done there as well.
Banging away through the woods made my fingers nervous. The brush guards that came stock on the KLX seemed fine for long grass, but not much more.
I needed more response, more power, more protection, and more traction.
More Response
The first area that I attacked was the responsiveness. Len Nelson's articles at Motorcycle.com showed me the way to solve this (see the end of this article for references). I immediately called up Larry Roeseller at Stroker Racing, and ordered the pumper carb and head pipe – what's known as the KLX Stage 1 upgrade.
![[KLX coming out of a corner]](../../../images/Articles/DualSport/corner.jpg) Len noticed much more of
an increase in power than I did. This could be because I have a Canadian model, and he has
the US model, or it could be because I'm just a bigger guy. The Canadian KLX300 has 33hp
stock, compared to 27hp in the US, which is because of more restrictive emissions
equipment, I figure. The bike did have more pep though, and wheelies could be had simply
by pulling the throttle open in first gear, which is a big improvement over stock. The
cost associated with this upgrade was $340 for the carb, and $140 for the head pipe. The
stock head pipe was designed in 1837, or so it seems, and has a very tiny diameter. The
Stroker head pipe makes use of the full diameter of the exhaust port in the engine.
Len noticed much more of
an increase in power than I did. This could be because I have a Canadian model, and he has
the US model, or it could be because I'm just a bigger guy. The Canadian KLX300 has 33hp
stock, compared to 27hp in the US, which is because of more restrictive emissions
equipment, I figure. The bike did have more pep though, and wheelies could be had simply
by pulling the throttle open in first gear, which is a big improvement over stock. The
cost associated with this upgrade was $340 for the carb, and $140 for the head pipe. The
stock head pipe was designed in 1837, or so it seems, and has a very tiny diameter. The
Stroker head pipe makes use of the full diameter of the exhaust port in the engine.
The stock carb is a Keihin 34mm CVK constant-velocity carb. In my opinion it is an el-cheapo excuse which made its way into the KLX300 via the dual-sport KLX250 model in Japan because Kawasaki had a bunch of them on contract already. It generates a "smooth power response" which basically means, you open the throttle, and you get power sometime in the future. I don't see how this is useful for anyone, let alone dirt riders. The Mikuni 33mm pumper carb from Stroker has a machined velocity stack (I don't know what that does for the carb, but it sounds good) courtesy of Stroker, and an accelerator pump, like the YZ400F. You twist the throttle, and it squirts gas into the cylinder, and your bike goes VROOM! That's the basic need there. The carb is 1mm smaller, which aims at getting more grunt out of the free-revving Kawasaki motor. The carb upgrade also comes with a Motion Pro throttle, which is much better to use than the stock bizzaro push-pull throttle.
Important note: installing the pumper carb is not a simple task. You are required to have a grinding tool, and you must be prepared to take a couple of hours to carefully grind some steel away from the head stay so that the carb will fit. The results are worth it though! Be sure to grind enough material so that the carb does not bind, and will be perfectly vertical. If the carb is not vertical, the floats won't operate efficiently at high RPM, so you'll lose your top end power.
You also need to raise the gas tank by about a quarter to a half an inch. The more room, the better, because the Mikuni carb is taller than the Keihin. You can raise the tank by folding up a square of aluminum foil (make sure you compress it hard) over and over again until it's a nice 2 inches wide by about 3 inches long and a half inch thick brick. Place this on top of the rubber seat for the gas tank, towards the rear of the bike, not the front. When the tank comes on, it will be a stretch to get the rubber clip on to hold the tank down, but it does make it, and all of the screws should still line up with the holes. If they don't, you might be too high, or you might want to try pushing the tank forward a bit. I routed my throttle cable to the right of, and underneath the right bar of the perimiter frame. It will be tight, but it should fit.
More Power
The next thing I wanted was some rip. Not just responsiveness off the throttle, but I wanted some "Uh oh" feeling out of the bike when the throttle opened up. Again, I dialed up Larry and he was more than happy to send me up a new cylinder and a Wiseco piston, bringing up my displacement from 292cc to 331cc, about 14% higher. Installing it was straightforward, and a more pleasant job than the carb which forced some grinding of "unnecessary" frame parts which get in the way. Stroker also sells an exhaust pipe, but after waiting a bit for it to be manufactured, I ended up going to an FMF MegaMax instead.
![[KLX Wheelie]](../../../images/Articles/DualSport/powerwheelie.jpg) The MegaMax is a pretty cool pipe, as
there are three modes you can run it in: racing, spark arrested, and quiet spark arrested.
For my needs in building a racing dual sport bike, this is the perfect pipe. I can be
quiet in the city, and pop off the cap at the track.
The MegaMax is a pretty cool pipe, as
there are three modes you can run it in: racing, spark arrested, and quiet spark arrested.
For my needs in building a racing dual sport bike, this is the perfect pipe. I can be
quiet in the city, and pop off the cap at the track.
With the bore kit, pipe, carb and header, I realized about an 8 hp increase, and a load more torque on the bottom end, making the once-docile KLX300 a barn burner at 41hp.
More Protection
I took off the silly Prince Charles-ears bush guards, and put on some Acerbis Rally Pros. I'm not sure I would go with Acerbis again. They routinely deliver things which are not properly sized for the application, and their tolerances are also pretty bad. You also have to be prepared to fabricate some equipment whenever you're considering putting Acerbis stuff on your bike. As is, the Rally Pro guards have performed fairly well, though I've heard reports of them bending on hard hits. Next time, I'm going to use Enduro Engineering guards.
![[KLX Side View]](../../../images/Articles/DualSport/halfprofile.jpg) I also put on some
Acerbis plastic frame guards, and they soon came off. Not because I took them off, but
before they had a chance to fully wear through and fall off that way, the zip ties that
come with the guards simply wore. The frame guards also wore away the paint on my frame
where they were attached, which is part of the problem they're supposed to prevent! Again,
Acerbis equipment just does not impress me. Larry at Stroker questioned my desire in
getting plastic frame guards, but I insisted, trying to save a couple bucks over aluminum.
I think the lesson is that when a guy who's won a bazillion off-road races makes a
suggestion, you should probably listen hard. Score one for Stroker, zero for me.
I also put on some
Acerbis plastic frame guards, and they soon came off. Not because I took them off, but
before they had a chance to fully wear through and fall off that way, the zip ties that
come with the guards simply wore. The frame guards also wore away the paint on my frame
where they were attached, which is part of the problem they're supposed to prevent! Again,
Acerbis equipment just does not impress me. Larry at Stroker questioned my desire in
getting plastic frame guards, but I insisted, trying to save a couple bucks over aluminum.
I think the lesson is that when a guy who's won a bazillion off-road races makes a
suggestion, you should probably listen hard. Score one for Stroker, zero for me.
![[Truing thr Rim]](../../../images/Articles/DualSport/rim.jpg) The stock DID rims don't get very high praise for
their ability to handle hits and not deform. I replaced mine with some Excels, though I
might also have done this for the trick look :-), well that was probably the only reason
though I'm trying to convince myself of the former. The supplier for the Excel Rims was MX
South, and Jeff gave me a good price.
The stock DID rims don't get very high praise for
their ability to handle hits and not deform. I replaced mine with some Excels, though I
might also have done this for the trick look :-), well that was probably the only reason
though I'm trying to convince myself of the former. The supplier for the Excel Rims was MX
South, and Jeff gave me a good price.
The picture to the left shows a trick you can use to build a simple rim runout gauge. Just clamp a simple tire pressure gauge to your forks so that the pressure meter rubs against the outside part of the mounted rim. As you rotate the rim, the pressure meter will be pushed back into the gauge by the high point of the rim. There will be a gap when you reach the low point of the rim. You should be able to adjust the spokes until there is no runout, in this manner. The picture isn't the clearest, as all I had was the polaroid when I was doing the work.
More Traction
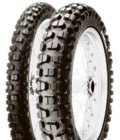 Do not ride off-road
with Dual Sport tires. You're risking your life if you expect those tennis-shoe treads to
grip anything. After riding a while on my stock rubber, I put on a Pirelli MT-21 on the
rear. It definitely does not grip like the Dunlop K695, but it is a knobbie and is a world
better than the standard 70/30 dual sport tire. I competed in a Hare Scrambles on a pretty
tough enduro course on this tire. I wouldn't recommend doing that, of course, but unless
you're doing really heavy stuff, it's a decent tire. Dunlop makes a K695 model which is
DOT approved, and I'm going to try that next time. The image on the right shows the tread
patterns for the MT-21 series. Better than a tennis shoe, but it's not a racer.
Do not ride off-road
with Dual Sport tires. You're risking your life if you expect those tennis-shoe treads to
grip anything. After riding a while on my stock rubber, I put on a Pirelli MT-21 on the
rear. It definitely does not grip like the Dunlop K695, but it is a knobbie and is a world
better than the standard 70/30 dual sport tire. I competed in a Hare Scrambles on a pretty
tough enduro course on this tire. I wouldn't recommend doing that, of course, but unless
you're doing really heavy stuff, it's a decent tire. Dunlop makes a K695 model which is
DOT approved, and I'm going to try that next time. The image on the right shows the tread
patterns for the MT-21 series. Better than a tennis shoe, but it's not a racer.
More Speed
I needed more top end speed for the highway sections between my trails. I went down to a 48-tooth rear sprocket. It's a White Bros. "Titan Tough," which is a repackaged Sprocket Specialists product, as far as I can tell. The bike makes loads and loads of useable, grunty torque now, so I could afford a bit of a drop at the rear wheel in exchange for dropping a few RPMs on the highway.
About the White Bros. "Titan Tough" sprocket: two things are for sure, it is no titan, and it isn't tough. After one trip, I had bent two teeth slightly, doing nothing unusual which would cause this, and after I derailed my chain in competition, I had broken four teeth. Two in getting the chain off, and two getting it back on. The sprocket just seems to be really soft. The teeth don't snap, but they can bend and fatigue, I gather, or get cut, which weakens them before breaking. While this may have saved the chain, and let me finish the race, I'm not sure that this sprocket would show any staying power in the long run. I am switching to Renthal sprockets to see how they'll stand up. I'm not discounting that I may have had a lemon sprocket, but I'm not going to take the chance again.
![[KLX Racing]](../../../images/Articles/DualSport/race.jpg) Speaking of the chain derailment, the KLX300 has
a very malleable tab to which the chain guide is bolted. A couple hard hits by rocks in
ruts can bend the chain guide, causing extra wear on the chain and sprocket. A very hard
hit, as happened to me, can bend the guide so much that it pushes the chain off the
sprocket, breaking teeth in the process, or snapping your chain. The solution to this is a
new chain guide from Stroker, which can be of two different models: a KX model which is
welded to your swingarm by the boys in the shop, or a trick billet aluminum part which is
far less bendy than the stock. I went the cheap route this time and got the billet part,
but if this happens to me again I'll send in my swingarm for the KX part.
Speaking of the chain derailment, the KLX300 has
a very malleable tab to which the chain guide is bolted. A couple hard hits by rocks in
ruts can bend the chain guide, causing extra wear on the chain and sprocket. A very hard
hit, as happened to me, can bend the guide so much that it pushes the chain off the
sprocket, breaking teeth in the process, or snapping your chain. The solution to this is a
new chain guide from Stroker, which can be of two different models: a KX model which is
welded to your swingarm by the boys in the shop, or a trick billet aluminum part which is
far less bendy than the stock. I went the cheap route this time and got the billet part,
but if this happens to me again I'll send in my swingarm for the KX part.
More Pretty
The kids love it when you've got a lot o' stickers on the bike, and who am I to make the kids sad? Really though, Stroker's service has been amazing, and the results are equally great, so I'm happy to put their graphics on the bike. As well they threw in a fender kit, and a shroud graphics kit for free when I did the cylinder upgrade, so on they went. The changes are subtle, but very noticeable. The bike looks much more formidable than with the stock graphics.
![[KLX Side View]](../../../images/Articles/DualSport/profile1.jpg) I smashed up my stock headlamp in a
crash... note, when it's cold out, the plastic likes to shatter! I replaced the stock
plate with a UFO model, which fit very well but was really for an XR400, and was white.
When I saw the Acerbis DHH headlight, I jumped at it! Of course, I was sorry when the damn
thing didn't fit right on anything with enduro equipment (like an odometer) or silly
unusual things like upside down forks. The look remains unusual though, and I keep the UFO
for racing, as it has my number on it. I try not to ride with the numerics on the street,
as that's just begging to be pulled over.
I smashed up my stock headlamp in a
crash... note, when it's cold out, the plastic likes to shatter! I replaced the stock
plate with a UFO model, which fit very well but was really for an XR400, and was white.
When I saw the Acerbis DHH headlight, I jumped at it! Of course, I was sorry when the damn
thing didn't fit right on anything with enduro equipment (like an odometer) or silly
unusual things like upside down forks. The look remains unusual though, and I keep the UFO
for racing, as it has my number on it. I try not to ride with the numerics on the street,
as that's just begging to be pulled over.
More Stuff To Do
The only thing I'd do to this bike now is to switch the springs, or change the suspension outright. I'm too heavy for it stock (I'm too heavy for most bikes), so any serious moto style stuff is going to give me fits. I don't really have the need for that, as my riding seems to be more enduro style, so I'm going to hold off and make a decision on this next summer.
|
Summary It took me a while to put this whole project together. I started from scratch without having done any serious riding or maintenance for about 15 years. By the time it was over, I had converted a dirt-only bike for street use, and had torn apart the engine (to a small extent) and put it back together, faster, and stronger than it ever was. |
There were a lot of bumps and bruises along the way, and it certainly took a lot of time and effort and heartache. Would I do it again? You bet! It was a hell of a lot of fun, almost as much as riding the bike. I have a pretty unique machine now, one that rips in the woods and can get me from point A to point B, wherever those points are.
These vendors supplied me with great support, and I advocate using them, and will continue using them myself:
- Stroker Four Stroke Speed Equipment: 760/948-2871
- MX South: 305/255-3718, http://www.mxsouth.com
These equipment manufacturers made great products:
- Stroker Four Stroke Speed Equipment: 760/948-2871
- FMF Racing: http://www.fmfracing.com/
While I didn't deal with anyone at UFO, or the Excel people, or the Motion Pro people, their products have been excellent.
The so-so stuff includes some of the Acerbis equipment, and the Pirelli MT-21 tires, but only because I'm racing on those tires. They are an excellent choice for trail riding. White Bros. also gets barely passing marks for shipping what's obviously a Sprocket Specialists' product, and a weak one to boot.
The only major thumbs down in all of this is for Acerbis. Their equipment invariably arrives and forces you to cut, bend, and splice, and/or completely fabricate parts in order to use it. And, there's no guarantee if it will even fit your bike. They're also the only vendor I called who would not ship anything to Canada. Come to think of it, their website didn't even work properly.
References
Len Nelson's articles and email communication put me onto the trail towards modifying my KLX, and without him, I wouldn't have been brave enough to do all of this work. Everything that went on my bike, I did myself, and it's been a long while since I've had the chance to do this kind of thing. Half of the fun in having a tricked-out bike is in the building of it. Your own sweat and blood goes into the bike (literally, if you pinch your thumb in the cylinder head :-), and that's what makes going out to the track and roosting a much more fulfilling experience than it otherwise would be. You and your bike blend together a bit, and your spirit and personality are forever embedded in that wonderful and quirky collection of metal, rubber and plastic.
I'm happy I did this, and I look forward to when I can do it again, with a YZ400F. I may have to wait until 2000 though!
You can read more about the KLX300 at the following articles:
- http://www.motorcycle.com/mo/mcbeware/klx-mods.html
- http://www.motorcycle.com/mo/mcdirt/trailrider/5klx.html
- http://www.motorcycle.com/mo/mcdirt/klxvsxr.html
Darcy Brockbank is a multi-semi-talented jack-of-all-trades. He spends his time writing software, playing with photography, making noise on one of his guitars, and (hopefully) riding his green street enduro. You can contact him at darcy@hasc.com or via the web at his home page.
![[Home]](../../../images/Navigation/DirtHome.jpg)
![[Back to Part 1]](../../../images/Navigation/DirtLeft.jpg)