|
XR600R Magneto Winding to
drive a 55/60 Watt lamp for cheap
This article discusses in detail how to rewind a 1996 XR600 to
boost the magneto capacity to drive a 55W lamp without draining the battery. Since little
to nothing has been done with the XR design from 1991 to 1998, identical methods are
likely applicable to these model years. The author has not checked the similarity to XR400
designs, although the technique may work well with XR400s and XR600s of earlier model
years.
Honda made the 1996 XR600 with little generation capacity. Dual sporting the bike
really requires this upgrade since the magneto can barely drive a 35 Watt lamp without it,
and no respectable street bike gets sold with a 35 Watt headlight. Experienced night
riders also know that 55 Watt lamps are mandatory for any serious off road forest
exploration!
Fortunately, Honda made the XR600 so that its windings could be augmented very easily.
It is a simple upgrade and the process is explained in detail.
Finally, these instructions have been proof-tested. This exact procedure was used by
the author on his own vehicle and has been in service for months.
I recommend that you read the complete instruction set before embarking. Instructions
sometimes require several lines and are not perfectly chronological.
List of materials required:
- High temperature heavy-insulated 18-gauge magnet wire. If you're green on how to get
this stuff, it's easy. Just call Allied Electronics at (800) 433-5700 and request part
number 214-3574. A 1-lb spool should cost $10 and will wind around 3 to 5 bikes. Ask for
equivalent wire in other brands if they quote you high.
- 3M 2216 or 3M 1838 epoxy. The author merely recommends these industrial epoxies because
they can take the heat and oil and will adhere to plastic insulation in the magnet wire.
There are others.
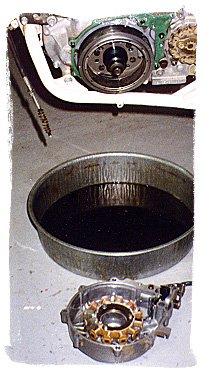 |
Figure (1) - Left side cover removed |
List of Tools required
- Soldering gun.
- Wire cutters.
- Wire strippers.
- Metric 8mm hex socket.
- Needle nose pliers.
- Metric Allen wrench and 10 mm wrench to pull side cover from bike.
Procedure:
- Remove the left side cover. Figure (1) shows the 1996 XR600R after this step. Don't
forget that the magneto cavity is wet, and you will dump over a quart of oil in this
operation.
- Pull the magneto housing from the side casing by removing the three hex head bolts that
mount it to the side cover. Also pull the sheet metal retainer clip that captures the
wiring in the side cover.
- Examine the magneto body to determine the routing of the magnet wire you will add.
Figure (2) shows the configuration. Note that there are 12 "cores" pointing
radially in the magneto. Each active element has many wraps of magnet wire where a voltage
is induced by the passing magnets in the flywheel. The windings at nearly 10 and 11
o'clock in Figure (2) power the ignition. The lower 4 windings that are eclipsed by the
source wiring to the vehicle are lighting coils. The other six cores are unwound. You will
wind the magnet wire about these.
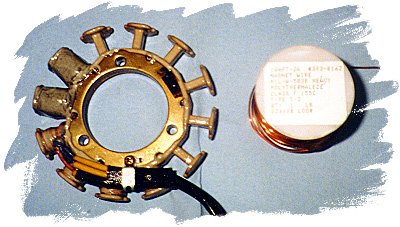 |
Figure (2) - Magneto assembly and magnet
wire stock |
 |
Figure (3) - Magneto with two windings added |
a) Note that the lighting coil from Honda follows the same alternating
clockwise/counterclockwise polarity. You must splice your wiring in series with the
existing Honda lighting while following the alternating sequence initiated by the Honda
coils. I suggest that you follow the Honda lighting wires (they are visible and unwrapped)
through the wrapping progression from an end that you choose arbitrarily. Note that you
have two leads from your magnet wire. You will cut the Honda lighting wire and connect
each of your leads to the two Honda ends created by your cut. If you violate the sequence
of the Honda leads and swap your wires in reverse polarity, no worries, you will merely
get the difference of the voltages generated by your coils and the Honda coils. In other
words, you will know that you must go back in and swap the lines.
- Cast epoxy over the windings you added. Use an epoxy that can take the heat and oil
exposure, and that can bond to the insulator plastic. I used 3M 2216 industrial epoxy.
Make sure to degrease before bonding, with a plastic-safe degreaser. I used a citrus
degreaser, and then some rubbing alcohol, and a shot from an air compressor.
Notes:
- Magnet wire is insulated with a clear coat. You must strip the insulation at the
point you wish to solder. I recommend soldering at your splice. Insulate it using the same
cloth insulator used by Honda. Also, remember not to scrape away the insulation on the
windings where it is needed.
- Verify your connections after soldering and check that you haven't shorted to the
side cover.
- Remember that this wiring sees lots of vibration, heat, and oil. Just strain relief
and insulate as Honda did. It'll work like that.
- Reinstall the magneto into the side cover and on the bike.
- Connect the wires from the stator to the regulator input. The stator generates AC only
and the polarity of these wires doesn't matter.
- Do a nasty trail at night for me!
Ride on, mother
Brad Allen
Senior Mechanical Engineer
![[Home]](../../images/Navigation/DirtHome.jpg)
|