|
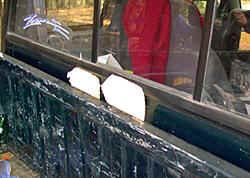
The Dreaded Bed-FlexIf you've hauled bikes in a truck for any length of time you've probably experienced the dreaded bed-flex. The usual symptom of this malady is a slight bend in the front panel of the truck bed. In severe cases, you can also notice missing paint on the back of the cab. This is due to extreme bending, in which the front of the truck bed actually contacts the rear of the cab. In the most extreme case you may also notice ripping of sheet metal and the failure of welds.
There are several ways to remedy this problem. One solution is to
shove something in between the truck bed and the cab, such as a couple of
big sponges (Figure 1). While this approach can work, it's usually
considered a temporary solution. Aside from the fact that it looks pretty
funny, the sponges wear quickly. One participating in such a fix can
also find themselves the subject of uncountable jokes.
In the case of our new Chevy Silverado, we wanted something completely different. This rig is intended to haul anywhere from one to four bikes at once. Trying to get three or four bikes into one truck is a challenge, to say the least. One of the main problems is the handlebars interfering with each other. Another problem is where do all of the tie-down straps attach to the truck.
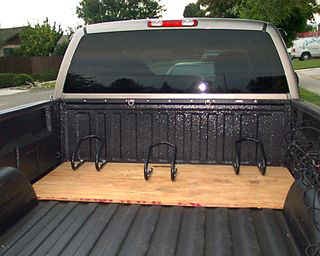
To solve these problems, we used some Lockhart Phillips wheel chocks mounted to a piece of plywood. The plywood is pre-drilled to accommodate several different configurations. Figure 3 shows the three-bike configuration. Notice that the middle wheel chock is set back from the two outer ones. This eliminates the handlebar interference problem. In the four-bike configuration, we also use a 2x4 between the bottom of the front fender and the tire so that the bars are at different heights (well, we haven't actually tried this but our first mock-up indicated that this should work). The plywood is sized so that it fits neatly on front of the wheel wells so that it stays in place. When it's not needed, it simply lifts out and hangs neatly in the garage, or beside the house, or where ever it's convenient. This solution provides another advantage in that it provides a solid foothold for the front tire. This helps prevent the bikes from shifting around on rough roads. It also has made loading equipment and gear much easier. When hauling multiple bikes, they are always in the same place. This guarantees that we have the same amount of room between bikes for the trip home as we did on the trip out.
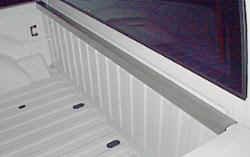
To solve the tie-down location problem, we installed a four-foot section of the Pro-Trak Tie-Down System to the front of the bed. The Pro-Trak Tie-Down System consists of a track and load attachment rings (Figure 4). Each ring can be moved along the track to provide numerous different tie-down locations. Just in case your're wondering, no the track is not stiff enough to prevent bed-flex all by itself. However, it could certainly be used in conjunction with some type of angle stock to provide a complete solution. Additional rings can be purchased separately. The whole system can be purchased from a variety of places such as Anchor USA, 4 Wheel Parts Wholesalers, or call direct at 909/699-2277.
|

![[Home]](../../images/Navigation/DirtHome.jpg)